
Building safe drops
![]()
Lee, I’m the boss of my local trail network, and I want to build bigger drops, but I want them to be safe. What is the best transition angle, etc?
– John
First, let’s define a drop. A drop is a feature where the rider leaves an abrupt edge then free-falls to a landing zone.
Ramps vs. transitions
Ramps. When you drop onto a tilted surface, the landing splits your energy into vertical impact and forward motion. A 45-degree landing gives you only 70 percent of the impact of a flat landing (the sine of 45 degrees is .7, bah, blah, blah). That’s good. But since you suddenly hit that 45-degree surface, there’s a moment of high impact, which can be disruptive to say the least.
Transitions. A curved landing gradually converts your vertical motion into horizontal motion. When you land on, say, a 70-degree slope there’s very little vertical impact. The transition smoothly redirects you forward. This spreads your impact energy over a huge area and treat you to a sweet landing. Swoooop!
So ramps are out and transitions are in. Ladders are out. Chutes are in.
Nice transition, nice
The angle and placement of your landing depends on the kind of drop you’re building. There are a zillion variations, but here are three basic types. Each is suited to different level riders.
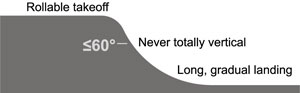
My First Drop By Playskool
This is safest for beginners, yet it lets experts have some fun. The takeoff should be roll-able, and the slope should never get quite vertical. The landing should gradually transition to flat. If you roll this it’ll feel like a roller coaster. If you air it, the landing will be super smooth.
Required skills:
– If you’re rolling: Basic position and balance. Stay in attack position, weight on your feet, and let the bike move beneath you.
– If you’re airing: Keep the front end up, land with both wheels at the same time.
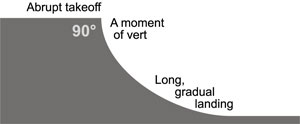
Low speed drop-in
Now we’re really dropping. Depending on how fast you go, you’ll pop off the takeoff and get a halfpipe-style landing, or you’ll float for a while then stick a smooth landing.
Required skills:
– All of the above, plus …
– Keep your front tire up until the rear tire takes off.
– Stay relaxed and balanced in the air.
– Land with both tires at the same time and absorb the impact with your arms and legs (mostly legs).
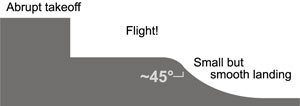
High speed flight
This is super common on trails and race courses. You carry speed off a takeoff then fly, fly, fly to a smooth landing. Think Durango national downhill course or the A-Line drop in Whistler.
Required skills:
– All of the above, plus …
– Judge your speed
– Maneuver your bike onto the landing
To sum it up
– Make all your landings gradual.
– The top of the landing should be sloped at least 45 degrees. Steeper for high, slow drops. Flatter for low, fast drops.
– Encourage riders to start mellow and not up the ante until their basics are wired.
– Dig local, ride global!
Comments are closed.