
Dialing in your bike setup step 1: Make it RAD
When it comes to mountain bike setup, the most important measurement is the distance between your bottom bracket and your grips. I call this the Rider Area Distance (RAD).
We want your bike RAD to fit your body’s size and proportions. When your RAD is dialed, two great things happen:
1. You have optimal arm range for bike handling: descending, braking, cornering, pumping, dropping and all the fun stuff, and
2. You can generate maximum torque for power moves: sprinting, steep climbing, pumping, manualing, hopping and wheelie drops.
While RAD seemed like my own brilliant idea, other people have been thinking this way.
 |
Q: Shouldn’t we be measuring bikes in a different way? For instance from pedals to grips?
A: That’s how Sam Hill measures his bike, he gets on any bike, no point telling him any numbers, he just gets a tape measure and measures feet to bars, and if it makes sense, then he’s happy, and away he goes. I do think that’s the only true measurement you can work off. – Ali Beckett, mountain bike designer, in International Mountain Bike Magazine |
In this video post on Pinkbike, the crew at Vorsprung Suspension calls RAD “spread.”
|
“This is what really determines how big your bike feels. How spread out you are between your hands and your feet.” |
That’s pretty rad.
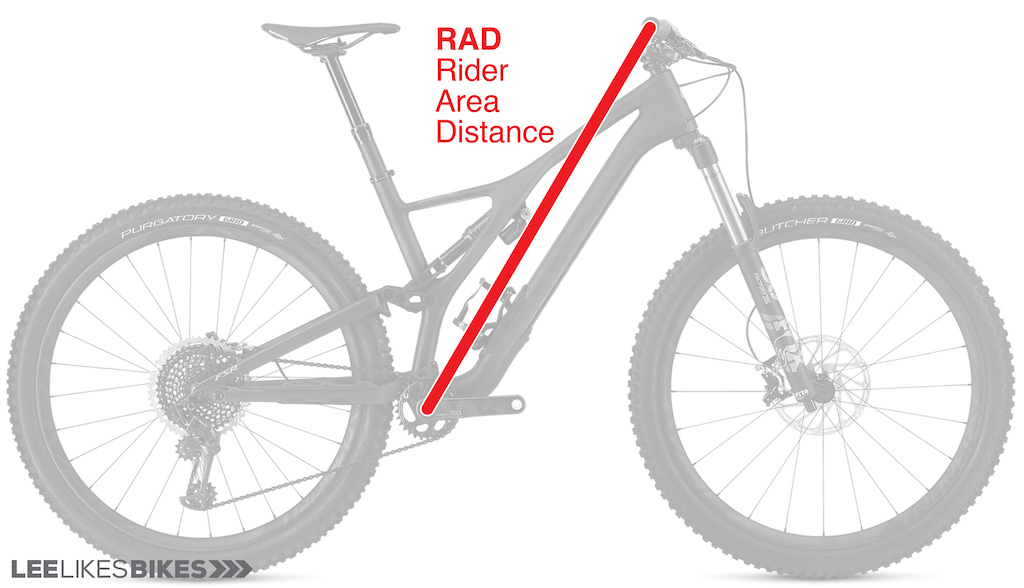
What exactly is RAD?
RAD is the hypotenuse of a triangle whose other two sides are the reach and stack of your entire cockpit, from the bottom bracket to your grips.
The components of RAD are:
• Frame reach
• Frame stack
• Height of spacers under your stem
• Tallness of your stem’s steerer clamp
• Handlebar rise
• Handlebar setback. This is probably a new term for you. Setback is the horizontal distance from the stem clamp to the grip. Someday we’ll all know the setbacks of our handlebars.

Finding your ideal bike RAD
Your ideal bike RAD is determined by your body’s size and proportions, as well as your handlebar width, crank length, pedal thickness, shoe thickness, phase of the moon and, by extension, the grunion run.
My book Dialed and site www.llbmtb.com provide several ways to determine your optimal RAD and calculate your ideal bike setup.

Here are two more methods:
1. If you love your current bike, measure its RAD. When you shop for a new bike, try to match that number.
2. Use a simple multiplier. The multipliers below assume average proportions, sweet spot handlebar width, height-appropriate crank length, and average pedal and shoe thickness. While these recommendations are not gospel, they are good starting points for most people.
If you’re male, multiply your height in centimeters by 4.47
If you’re female, multiply your height in centimeters by 4.60
At 174 cm tall I get a RAD of 778mm. My bikes are within a few millimeters of this number.
Warning: These multipliers will give you shorter RADs than you typically find on fashionable bikes. Bikes have gotten longer but people haven’t.
Adjusting your RAD
Q: How close to perfect does RAD have to be?
A: The closer the better.
We can of course ride a wide range of bike setups (we’ve been doing it for years). As your bike RAD gets closer to ideal for you, your bike will start to feel better. When you get to the last 10mm, then the last 5mm, then to perfect, something clicks. Your bike just feels right. You climb technical trails easier and shred technical downhills harder.
When bike RAD is too long, you reduce torque and reduce control. I’ve set up about 1,000 riders, and 95% of their bikes had too much RAD. Most riders don’t know any better.
When bike RAD is too short, you reduce torque and increase control (to a point). Some downhill and freestyle riders, who need more range of motion than peak sprint power, have RADs that are “too short.” This is common among tall riders. When it comes to RAD, a bit too short is much better than a bit too long.
You can adjust your bike’s RAD in a few ways:
Reach. Change the stem length or use a handlebar with different setback.
Stack. Move spacers above or below your stem. Change to a stem with different rise. Try a handlebar with different rise.
Frame size. This is the last resort. These days, as frame reaches get longer, many riders should consider a smaller size. By the way, it makes sense to measure before you buy.
If your frame is the correct size and your RAD is perfect, your bike will handle great.
That said, you can dial in your bike even more by adjusting the angle of your RAD relative to level. I call this your Rider Area Angle in Degrees (RAAD). We’ll talk about that next time.
I hope this is helpful.
Lee
Leave a Reply
Want to join the discussion?Feel free to contribute!